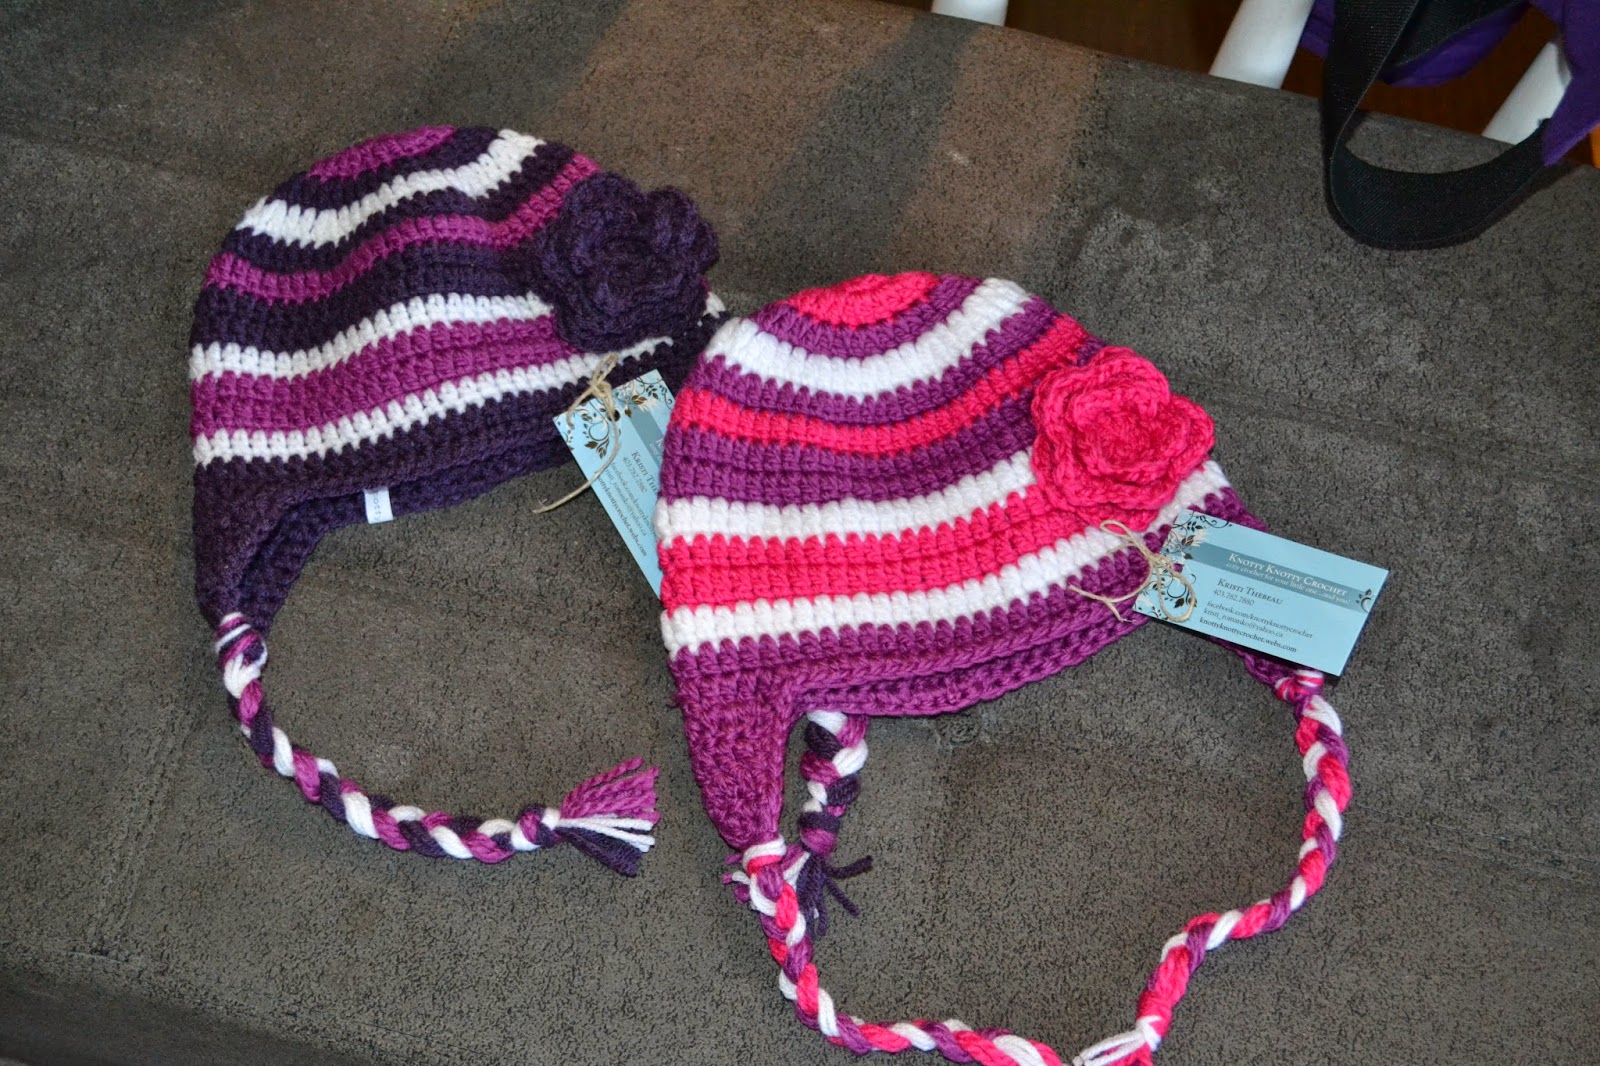
This is my new favourite hat to do because it is super simple, yet looks great. You can use as many or few colors as you like, and each hat will be unique and different with the SAME PATTERN! Gotta love that.
I have been having a little pouting fit lately because the bulky yarn I used to use from Bernat was discontinued and replaced with a new 'super' bulky yarn. sheesh. Didn't they consider that I had already spent a LOT of time figuring out exactly how many stitches, rows, etc went into making each size of hat perfectly....they probably didn't. And so, my pattern that I love is no longer useful with the yarn I liked because it is no longer available. But the colors I love are, just in this new bulkier yarn. So I took the time to play with hook size, stitches, counting measuring and I FINALLY figured out a way that I can make my hats. They are a bit thicker, and warmer which is fantastic considering the average tempurature here in northern Canada has been around the -30 C mark (that would be around -22 F for my friends south of the border).
So here is my pattern:
Materials
super bulky yarn size 6 in three colors (I used Bernat Softee Chunky in Grape, Dark Mauve and White)
K hook (6.5mm)
Darning needle for weaving in ends
COLOR A
Begin with magic ring
Round 1: 10 hdc in the magic ring. Pull tail closed and join to first hdc. (10 sts)
Round 2: ch1. 2 hdc in each stitch around. Join to first hdc made. (20 sts)
CHANGE TO COLOR B
Round 3: ch 1. *2 hdc in first st. 1 hdc in next st.** Repeat from * to ** 9 more times. (30 sts.)
CHANGE TO COLOR C
Round 4: Ch 1 *2 hdc in first st. 1 hdc in each of the next 2 sts. ** Repeat from * to ** 9 more times. (40 sts)
CHANGE TO COLOR B
Round 5: Ch1. *2 hdc in first st. 1 hdc in each of the next 3 sts.** Repeat from * to ** 9 more times. (50 sts)
CHANGE TO COLOR A
Round 6: Ch1. hdc in each sts around. (50 sts)
CHANGE TO COLOR B
Rounds 7 & 8: Ch1. hdc in each sts around. (50 sts)
CHANGE TO COLOR C
Round 9: Ch1. hdc in each sts around. (50 sts)
CHANGE TO COLOR A
Rounds 10 & 11: Ch1. hdc in each sts around. (50 sts)
CHANGE TO COLOR C
Round 12: Ch1. hdc in each sts around. (50 sts)
CHANGE TO COLOR B
Round 13: Ch1. hdc in each sts around. (50 sts)
Fasten off yarn using invisible knot.
ADDING EARFLAPS
1) Fold hat flat with the joining seam in the middle of the back. Be sure the front of the hat is facing you. Count in four stitches from each side and place a marker at both spots. count back 10 sts, including the st the marker is in and place another marker at each spot. This is where the earflaps should be. Join yarn (I join the left earflap from the front of the hat and the right one from the back so my flaps both look the same.) ch 2, dc in same st as ch 2. dc over next 9 st. (10 dc, as ch 2 does not count as dc) ch2 turn
2) dc2tog dc till 2 sts remain. dc2tog. ch 2. trun.
3) dc2tog over next 2 sts. dc until 2 sts remain. dc2tog. ch 2. turn.
4) Dc2tog over next 2 sts. dc until 2 sts remain. dc2tog. ch 2. turn.
5) dc2tog over next 2 st. dc. dc2 tog over next 2 st. do not fasten off. turn work so that right side is facing you. sc evenly down side of earflap, sc in each st around. fasten off with invisible knot.
add strands to the bottoms of the earflaps for braiding.
FLOWER
start with a magic ring.
Round 1: 10 hdc in magic ring, join to top of first hdc made. pull tail of yarn tightly to close ring.
Round 2: (ch 3, skip next hdc. sl st into next hdc.) Repeat 4 more times. 5 loops made.
Round 3: working into each loop made by the ch 3: (sc, hdc, dc, hdc, sc) 5 petals made. after completing the last sc, sl st into the back of first petal made where the ch attaches to the original circle made in round 1.
Round 4: Ch 4. sl st to the back between petals 1 & 2. Repeat always connecting to the back behind each petal. 5 new loops made.
Round 5: working into each loop made by the ch 4: (sc, hdc, 2 dc, hdc, sc) 5 petals made. Sl st behind petal and fasten off leaving a long tail for sewing on flower.
You can continue making a third round by making another row of loops (increasing by one more ch) and then another row of petals (increasing by one more dc).
There it is. Try experimenting with different colors and patterns. I would love to see what you come up with. Feel free to post your projects on the knotty knotty crochet group on facebook! If you are having trouble getting the size that you need refer to the hat size chart.

 |
| I made this little hat for my daughter's doll so that they could match! |
For a list of crochet stitches and how to make them go here. **You may use this pattern to sell items, but I request that a link or credit be given back to this site** This is a ©2014 Knotty Knotty Crochet pattern, and may not under any circumstances be sold in whole or in part. Duplication is by written permission only.
All photos on this blog are ©Knotty Knotty Crochet and MAY NOT UNDER ANY CIRCUMSTANCES be used to sell your items.
All photos on this blog are ©Knotty Knotty Crochet and MAY NOT UNDER ANY CIRCUMSTANCES be used to sell your items.


The pattern states: Begin with magic ring Round 1: 10 hdc in the magic ring. In the magic ring video attached the lady does single crochets into the ring. Does this pattern mean do the hdc after thc sc in the ring? or to do the hcd (in the ring) in place of the single crochets?
ReplyDeleteGood question. It means to do hdc in the magic ring instead of sc. The video just shows how the magic ring works so that you don't get that little hole in the top of your hat. When you are done I would love to see your hat :) Head on over to the knotty knotty facebook group page and post a photo :)
DeleteThank you!! I think i figured it out. I did find a video that has a magic ring with HDC. She did the magic ring and then ch 1 or ch2 (just like your linked video). Is this what you did? does the chain 2 count as a stitch? so then it would be the ch2 as a stitch and then 9 hdc?
DeleteWhat size (child's age) head does this pattern fit?
Hi, I'm picking up crocheting after MANY years of not doing it. I'm doing the http://knottyknotty.blogspot.ca/2014/01/super-bulky-striped-hat-free-pattern.html and wondered how many stiches and rounds I would need for the 3-10 year old head circumference. My daughter is 5 with a pretty big head! lol Please let me know. Thank you! :) BTW, love this pattern! The first hat I've tried :)
ReplyDeleteHi Kim,
Deleteyou can check on the hat chart http://knottyknotty.blogspot.ca/2013/11/new-and-improved-hat-sizing-chart-free.html
This will give you approx measurement of 6 inches (15cm) across for the crown or circle of the hat before you stop doing increasing rows. Then it will fit the proper hat size. I hope that makes sense. Do check out the hat chart.
You can experiment with the number of stitches you start in your magic ring. I would do anywhere from 10-13 sts depending on how tightly you crochet, yarn size, hook etc. Its a bit of trial and error, but once you get it you will be able to size any hat. Good luck!
I understand now! It's the crown that I'm creating! :) I checked the sizing chart, and now that I know it's crown I'm working on, it makes sense. Thank you so much! :)
DeleteWhat size is this hat (age range)? I am making one for a 7 year old. I understand the crown sizing and mine seems to be the same as what you did. The length just looks to short. According to what I have found it needs to be 8 inches in height. Is this including the ear flaps? I love making hats but I hate when they don't fit. Thanks for any help you can give.
ReplyDeleteWhat size is the hat in the pattern? Like for what age? How would I make it smaller if I needed to? Thanks!
ReplyDeleteThere is a great hat chart on the blog, that will help you determine size. Everyone crochets different. Some looser, some tighter so you really do need to rely on measuring your crown size (the size of the circle you make before you stop increasing.) This pattern fit my 7 year old daughter. the hat sizing chart can be found here: http://knottyknotty.blogspot.ca/2013/11/new-and-improved-hat-sizing-chart-free.html
DeleteSo do I make less stitches in the magic ring?
ReplyDeleteI am wondering what colors you used in the hat with the matching doll hat? Obviously white and then I think it is the hot pink, so what are the colors of the trurqouise and the purple? And how many skeins of yarn would I need to make a hat like this? I have heard that there isn't much yarn on the skein. Thanks so much and it looks beautiful!!
ReplyDeleteThis comment has been removed by the author.
ReplyDeleteWhat colors did you use for the doll combo hats?
ReplyDeleteGreat pattern
ReplyDeleteIve just finished a hat for my nephew
Thankyou for sharing 😊
This comment has been removed by the author.
ReplyDeleteThis comment has been removed by the author.
ReplyDeleteI still have some of the older Bernat Softee Chunky (before it was super sized). Do you still have your older version of the pattern? Or would I use this pattern do make my hat according to the hat size chart? I am assuming I would use a smaller hook?
ReplyDeleteWhat should I do to make the hat smaller
ReplyDeleteI can’t imagine focusing long enough to research; much less write this kind of article. You’ve outdone yourself with this material. This is great content. Dslr camera price in pakistan
ReplyDeleteMEN COWBOY WESTERN LEATHER JACKET is one of the unique additions to our premium leather products. It is made in genuine suede leather with perfectly cut equal size fringes. We have wide variety of designs in western Jackets. We have almost all color option in these Jackets. WESTERN LEATHER JACKET is hand crafted with quality beads work. These jackets will give you an attractive look. We have custom tailoring options as well. The garment you’ll receive will be of exact measurement that you’ll choose from the size chart.
ReplyDeleteWESTERN LEATHER JACKET
Mready mens leather bomber jackets have outstanding combination of premium quality real leather and top quality extra fine elastic rib. Very soft quilt lining used inside will feel you more relaxed in both indoor and outdoor activities.
ReplyDeletehttps://www.w3schools.com/tags/tryit.asp?filename=tryhtml_a_href
Nice tactics shared.
ReplyDeletehttps://goldencamera.pk/shop/
Since the sport of boxing has been known, traditional heavy bags have been a part of any boxer’s training environment. They are variety of bags widely used due to the versatility they offer since there are multiple models and sizes to adapt to each of the disciplines of combat sports or martial arts.
ReplyDeleteThis comment has been removed by the author.
ReplyDeleteWhat a playful and inventive hat pattern! For anyone wanting to pair cozy winter accessories with a fashionable outer layer, a mens leather coat is an ideal choice — providing warmth, durability, and timeless style.
ReplyDelete