Friday, 11 November 2011

Funky Monkey Free pattern

My 4 year old son LOVES red. He loves anything red. He has even changed his name from Ben to Lightning McQueen, because McQueen is red. He is a ball of energy and fun, and so I designed this hat with him as my inspiration. This is just the basic sock monkey pattern with a few variations. The sock monkey hat can be found on this blog or by clicking here. Everything is done the same up to the first round of row 7. Then I alternated rows of sc in red and dc in black. (After row 6 which is 2 rows of sc in red) There is a total of 5 rows of black dc with 4 rows of red sc in between. I gave him crazy eyes because plain black buttons didn't show up on the black yarn very well.
The black pupil is the same as the first round as I use to make the ears, and then I did 2 sl st in each st around with white.

To do the faux-hawk, I used 6 strands of yarn (2 of each color) and looped them around each dc post of the crown of the hat. I left them longer than I needed then I trimmed them all to the same length. They do not stand up if they are too long, so play around with the length.

I really hope my variations make sense to read, because the sky is the limit with color combos you could do with this crazy monkey!! have fun, and I have started a new album on my facebook page called inspirations. I would love to see any other variations of this guy or any other creations you have on there!
Happy crocheting!


For a list of crochet stitches and how to make them go here.

**You may use this pattern to sell items, but I request that a link or credit be given back to this site** This is a ©Knotty Knotty Crochet pattern, and may not under any circumstances be sold in whole or in part. Duplication is by written permission only.

Friday, 15 July 2011

beware of moths!

And beware of 2 year old boys! My little guy just loves anything knit or crochet, and always has! How exciting for me as a crochet addict to be so appreciated. However, I think he likes the soft cuddly blankets for more than one reason.....he likes to pick them apart! The other day when I couldn't find his favourite "ganky" (blanky) as he calls it, my husband suggested throwing a ball of yarn in his bed with him! (as a joke of course) I wanted to share a picture of little Willie with his very favourite bedtime and anytime friend, the beloved ganky. (Sorry, no pattern this time, this was actually knit by a friend for my first son Ben, but was hand-me-downed to little Willie)


Wednesday, 25 May 2011

Wowza!

Well I wasn't expecting to have followers....now I feel obligated to find more free patterns and offer them to you. I just completed this dress for a baby that I LOVE! You will love this too, its so cute. I used a simple halter style top like the pattern I found here. Then I used strips of inexpensive tule I bought in the $1.97/m bin at Walmart (that is when our Walmart still carried fabric). I had purchased this with a different use in mind, and then never got round to using it. Anyhoo, I cut approximately 8-10 inch long strips about 3 inches wide. Then I folded them in half and using a H hook pulled the fold part through the original ch of the halter. Then I pulled the loose ends through the loop and pulled. So easy. I will try to add pics of this later! This is the final product! a little ballerina dress for your little princess!

Thursday, 14 April 2011

Knotty Knotty items available on facebook

For anyone stumbling across this site that does not crochet, but would like to purchase a hat or other item, I have a facebook group that anyone is welcome to join and to shop in! just go here to sign up. Be sure to check back often as I am constantly adding new treasures!

These are so cute on baby and I have made several pairs all in different colors, the pattern can be found here.

Wednesday, 13 April 2011

Little Lizzy's Headband FREE PATTERN

Now that it is way to warm out for some of her hats, My little one needs something cool for spring that will add the special something to her wardrobe.
This headband is so super cute! A perfect crochet project if you only have 10 minutes, and a great gift for spring! I think I might have to make one of these to match every outfit my little Lizzy owns!

Materials used:
Small amounts of any kind of yarn. I prefer cotton, but these two were done using worsted weight acrylic (white flower) and Bernat's Satin (pink flower)
any type of button for centre
measuring tape
yarn needle
G or H hook.
gauge is not important, just make sure the measurement of the band will fit the head of the one you are making it for!

Pattern

White Flower headband:

start with Magic ring, being sure to leave a long tail for sewing button.

Ch2

Row 1.  12 dc in magic ring. Join with sl st to top of ch2. pull tail to tighten circle

Row 2. Ch2. 4 dc in next st. ch 2 join with sl st in next st. petal made.

*Ch2. 4dc in next st. ch 2. join with sl st in next st* continue around until 6 petals are made ending with joining with a sl st in the starting st.

Sl st in back post of dc in row 1.

ch approximately  45, or enough to measure 13 inches. (or desired size to fit baby's head.)

join to underside of flower with a sl st, being carful not to twist band. Fasten off yarn, leaving a long tail.

using tail from magic ring, use yarn needle to join button. If your button has four holes, I like to do two of them with the tail from the magic ring and two of them with the tail from the chain band. fasten tightly, being sure the button is not loose (we don't want any choking babies, now do we?)

Pink Flower headband:


start with magic circle, be sure to leave a long tail for sewing button.

ch 2. 14 dc in magic circle. sl st in top of ch 2 pull tail to tighten circle.

ch 1. sc in sam st.

ch 2, skip next st. *sc in next st. ch 2. skip next st* (loop made)

continue from * to* around join with sl st to first sc. (7 loops made.)

(sc, hdc, 3 dc, hdc, sc) all in first loop (petal made)

repeat for each of the 7 loops around. join. (first petal row made)

working behind this first row of petals, sc around the post of first sc on petal row.

ch 4 *sc around post of next sc on first petal row. ch4* repeat from * to * around. join. 7 more loops made.

In first loop (sc hdc, dc, 2 tr, dc, hdc, sc) first petal made. repeat in each of the remaining 6 loops. 7 more petals made.

sl st in back post of sc.


ch approximately  45, or enough to measure 13 inches. (or desired size to fit baby's head.)

join to underside of flower with a sl st, being carful not to twist band. Fasten off yarn, leaving a long tail.

using tail from magic ring, use yarn needle to join button. If your button has four holes, I like to do two of them with the tail from the magic ring and two of them with the tail from the chain band. fasten tightly, being sure the button is not loose .

Enjoy these little headbands, experament with color change variations to your hearts content!

**You may use this pattern to sell items, but I request that a link or credit be given back to this site** This is a ©Knotty Knotty Crochet pattern, and may not under any circumstances be sold in whole or in part. Duplication is by written permission only.

Thursday, 31 March 2011

LIttle brimmed hat FREE PATTERN!

So here goes another attempt at a free pattern! I have done this one also in grey with no contrasting color and it is just as cute! Try doing the brim working in the front row only, makes it stick out a bit more. This hat is just too cute on. I'm going to try to do some with flowers and in girly colors too!
Let me know if there are any problems with this pattern. THanks for looking!


Materials: variegated yarn
                solid color yarn in matching color.
                2 buttons

Hook size: G

Guage 11dc and 9 rows=4" (approx)
This pattern will fit newborn-3 month old baby

with variegated yarn ch 2
1. 7sc  in first ch

2. 2sc in each of 7sc. Place marker. (14sc)

3.2sc in next st. sc in nect st continue around to marker. move marker (21sc)

4.  2sc in next st. sc in next 2 st. continue around to marker. Move marker (28sc)

5. ch2. dc in same st as ch2. dc in next 3 sts. *2dc in next sc. dc in next 3 sts.* continue around. join with sl st to top of ch 2. (35 dc) place marker. This is the BACK of the hat.

6.  ch2. dc in same st as ch2. dc in next 4 sts. *2dc in next sc. dc in next 4 sts.* continue around. join with sl st to top of ch 2. (42 dc)

7. ch2. dc in same st as ch2. dc in next 5 sts. *2dc in next sc. dc in next 5 sts.* continue around. join with sl st to top of ch 2. (49 dc)

8. ch 2. dc in same st and each stitch around. join with sl st to top of ch 2. Continue in pattern 6 more rows. Fasten off.

BRIM
1. using contrasting color attach yarn 16st from back of hat.ch 2. dc in same st and dc 17 sts across fron of hat.ch 1 turn.

2. sc2tog sc all the way across to the last 2 sts. sc2tog. ch1. turn

3.sc2tog. sc all the way accross to the last 2 sts. sc2tog. sc again in the last st.

4. work 2 sc evenly down the side of brim, sc around the base of hat to opposite side of brim. work 2 sc evenly up side of brim and across front of brim. sl st down side of brim and fasten off, weaving in ends.

STRAP
ch26

DC in fourth ch from hook. dc across to first ch. ch 3 and attach to first ch of foundation row. Fasten off.

Sew evenly on to hat over brim and attach buttons using  darning needle.


For a list of crochet stitches and how to make them go here.

**You may use this pattern to sell items, but I request that a link or credit be given back to this site** This is a ©Knotty Knotty Crochet pattern, and may not under any circumstances be sold in whole or in part. Duplication is by written permission only.


Wednesday, 23 March 2011

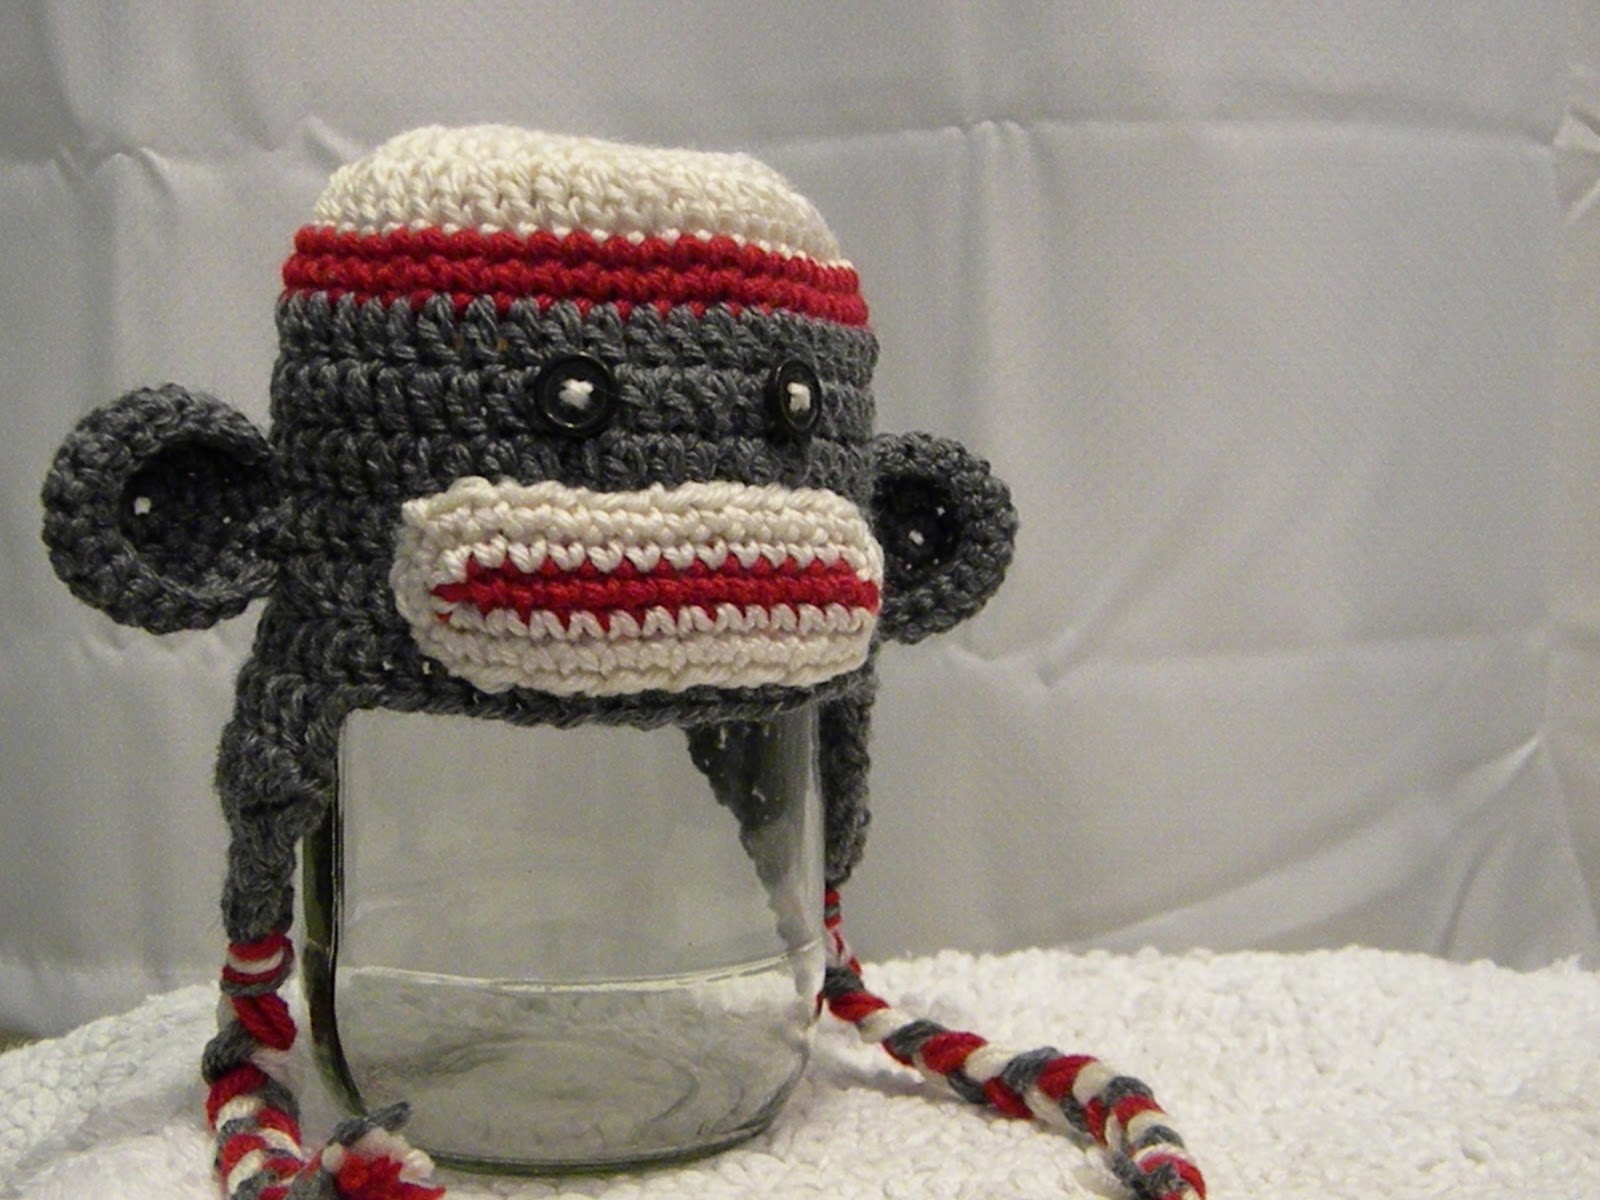
Free Sock Monkey hat pattern!


So, for those who love this little monkey as much as I do, I am attempting to do this as my first free pattern available on my blog. I saw a picture of this adorable hat and had to try it. So thats what I did. I didn't have a pattern for this I just kind of "eyeballed" it. So sorry, if it doesn't make sense, post if you have a comment or question!

SOCK MONKEY HAT

Materials used
worsted weight yarn. I used pattons "canadiana"
in grey, cream and red.
Black buttons (2)
g hook

guage?? I will have to make a guage swatch and come back to this. The finished hat fits a 3 month old baby, but the pattern will be anywhere from newborn to 3 months.

Start with cream color by ch 4, join to first ch to form ring (or use magic ring).

1.ch2 6dc in ring. Join to top of ch 29 (UPDATE: OMIT THIS ROUND, THIS SEEMS TO MAKE THE HAT TOO POINTY. START INSTEAD ON ROW 2 WITH 12 DC FOR THE FIRST ROUND AFTER THE MAGIC RING. NOTE THAT CH2 COUNTS AS FIRST DC.)

2.ch2 2dc in each dc (12 st) join every round unless otherwise noted

3.ch 2 (2dc in next dc, dc in next dc) 6 times (18 sts)

4.ch2 (2dc in next st, dc in next two sts) 6 times (24 sts)

5.ch2 (2dc in next st, dc in next three sts) 6 times (30 sts)
change to red yarn ch 1

6.ch 1 (sc in each st around) 2 times ( you will have 2 rows of red in sc)

7.change color to grey ch 2
dc in same st, dc all the way around. Continue in pattern until 6 rows of dc are done.
break off yarn

earflap: (make two)
start by attaching grey yarn to hat

1.dc 11, ch 2 turn

2.dc2tog, dc in next 7 st dc2tog ch 2 turn

3.dc2tog, dc in next 5 st, dc2 tog ch 2 turn

4.dc2tog, dc in nex 3 st, dc2tog ch 2 turn

5.dc2tog,  dc in nex st, dc2tog ch 2 turn

6.dc2tog twice. break off yarn.

Monkey ear:
 use grey. ch 2

1. 6sc in second ch from hook
do not join

2. 2sc in each of the 6 previous sc. (12 sts)

3. (2sc in next st, sc in next two sts) 6 times (18 sts)

4. 18 sc around (2 times). Break yarn leaving 12" at least for sewing on. attach using darning needle.

Monkey mouth
with red ch 15
1. sc in second ch from hook, and in each stitch across. sc a second time in last st.

2. working on the under side of initial chain sc all the way sc twice in last st.

3. change to cream yarn. sc all the way around twice, doing two sc in each of the "corner" stitches. Leave a long tail for sewing to hat.

Attach black buttons for eyes using cream colored yarn, or thread.

I used four strands of each color to attach tie strings on to the earflaps and braided them, then trimmed the ends.

Here are some more variations of color that you could do....the sky is the limit!


Hope you have fun with this pattern! If you would like to purchase a pre made hat, please visit us on facebook at Knotty Knotty crochet


For a list of crochet stitches and how to make them go here.

**You may use this pattern to sell items, but I request that a link or credit be given back to this site** This is a ©Knotty Knotty Crochet pattern, and may not under any circumstances be sold in whole or in part. Duplication is by written permission only.

Little flying ace hat, scarf and boot FREE PATTERN!

 I have been wanting to do this little set for a while, and was thrilled when a friend ordered it for her new grand-baby. I can't wait...